
Picture this: You’re sitting, scrolling through your code, feeling stuck and frustrated because your tests aren’t cutting it. You’ve tried everything, from testing your functions individually to mocking your APIs, but nothing seems to work.
But what if we tell you that the key to writing powerful Jest tests lies in advanced techniques that let you time travel to the future of automation testing? Yes, you heard it right – with advanced techniques, you can write tests that can predict how your code will behave in the future.
So, let’s explore some of the most advanced techniques for writing powerful Jest tests that can help you take your testing game to the next level. But first, let’s take a step back and understand why Jest testing is so important in the first place.

Contents of Post
Why is Jest testing so important?
Just like building a solid foundation is crucial for constructing a sturdy building, testing is crucial for ensuring that the software we build is robust, reliable, and user-friendly. Without testing, you run the risk of delivering buggy code that could lead to unhappy users, lost revenue, and even damage to your brand’s reputation. That’s why Jest testing is so important – it allows you to catch bugs and issues early on in the development process, so you can fix them before they become major problems.
Jest testing lets you “test” your code before releasing it into the wild, so you can ensure it meets your high standards for quality and functionality.
Advanced Techniques For Writing Powerful Jest Tests
Jest is a popular JavaScript testing framework that provides a lot of functionality out of the box. However, to write powerful tests, it is essential to use some advanced techniques. Here are some advanced techniques for writing powerful Jest tests:
1. Mocking
Mocking is a technique that allows you to replace these external dependencies with simulated objects, also known as mocks. By using mocks, you can isolate the code under test from external dependencies, making your tests more predictable and reliable.
In Jest, you can use the jest.mock() function to create mocks of modules or functions. For example, let’s say you have a function that makes an HTTP request to an external API:

When testing this function, you might want to mock the fetch function, as it is an external dependency that is not under your control. To do this, you can use jest.mock() to replace the fetch function with a mock implementation:
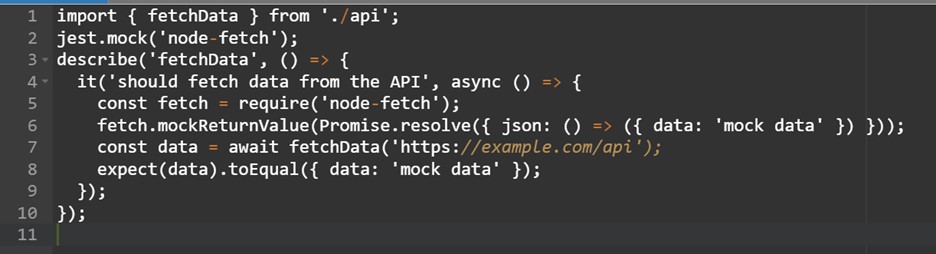
// api.test.js
In this example, we first import the fetchData function from api.js. We then use jest.mock() to replace the fetch function with a mock implementation. We then use require() to get a reference to the mock implementation, and we use mockReturnValue() to define the behavior of the mock. In this case, we return a Promise that resolves to an object with a json() method that returns some mock data.
We then call fetchData() with a mock URL and assert that it returns the expected data.
By using mocking, we can test the fetchData() function in isolation, without relying on an external API. This makes our tests more predictable and reliable, and it allows us to catch bugs and errors before they reach production.
2. Snapshot Testing
As a developer, you want to ensure that your UI components render correctly and consistently across different browsers and devices. However, testing UI components can be challenging, as they often have complex rendering logic that can be difficult to test manually.
Snapshot testing is a technique that allows you to capture the output of a component or function and compare it with a previously saved snapshot. If the output has changed, Jest will flag it as a failure. This is useful for testing components that have complex rendering logic or for catching regressions that could be introduced by changes to the codebase.
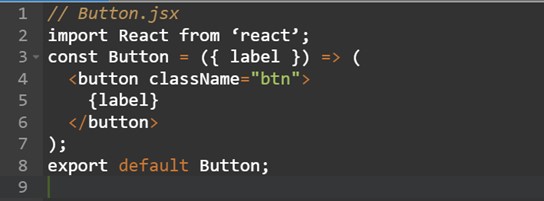
In Jest, you can use the toMatchSnapshot() matcher to create a snapshot of the component. For example, let’s say you have a simple React component:
When testing this component, you might want to create a snapshot of its output to ensure that it renders correctly. To do this, you can use the toMatchSnapshot() matcher:
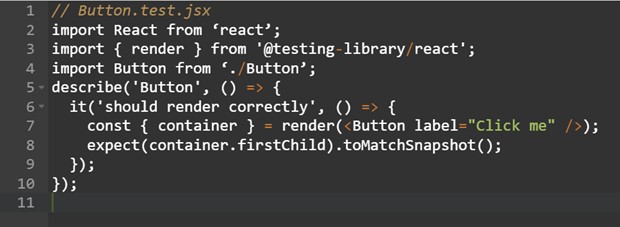
In this example, we first import the render function from @testing-library/react, which allows us to render the Button component. We then use toMatchSnapshot() to create a snapshot of the component’s output.
When you run this test for the first time, Jest will create a new snapshot file that contains the rendered output of the Button component. When you run the test again, Jest will compare the current output with the previously saved snapshot. If the output has changed, Jest will flag it as a failure, indicating that the component’s rendering has changed.

3. Testing Async Code
Asynchronous code is an essential part of modern web development, as it allows us to perform tasks that could take a long time without blocking the main thread of execution. However, testing asynchronous code can be challenging, as the outcome of the test might depend on the timing or order of the asynchronous operations.
To handle asynchronous testing scenarios, Jest provides several functions for testing asynchronous code, such as async/await, Promise, and done. By using these functions, we can write tests that wait for asynchronous operations to complete before making assertions.
For example, let’s say we have an asynchronous function that fetches data from an API:

To test this function, we can use the async/await syntax to write an asynchronous test in a synchronous style:
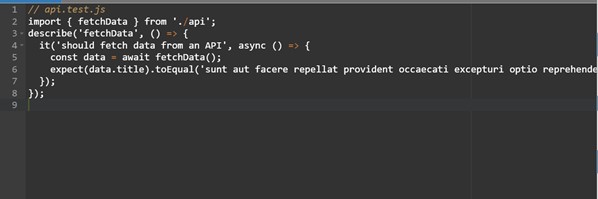
In this example, we first import the fetchData function from api.js. We then use the it function to define a test case that fetches data from the API using fetchData. We use the async keyword to indicate that this is an asynchronous test, and we use the await keyword to wait for fetchData to return the data.
Once the data is returned, we use the expect function to make an assertion that the title property of the data object is equal to the expected value.
Alternatively, we can use the done callback to signal the end of the test. For example:
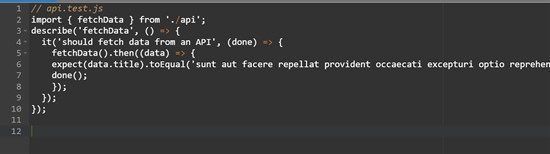
In this example, we use the it function to define a test case that fetches data from the API using fetchData. Instead of using async/await, we use the then method to handle the result of the fetchData function.
Once the data is returned, we use the expect function to make an assertion that the title property of the data object is equal to the expected value. We then call the done callback to signal the end of the test.
Finally, we can use expect.assertions() to ensure that a certain number of assertions are made in an async test. For example:
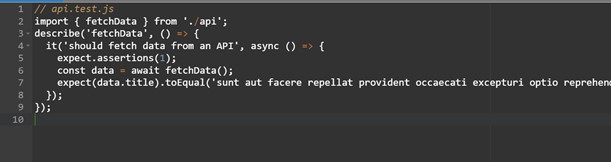
In this example, we use the expect.assertions() function to ensure that one assertion is made in the test case. This helps to catch scenarios where the test might pass even though no assertions were made. We then take the help of the await keyword to wait for fetchData to return the data.
4. Code Coverage
Code coverage is a useful metric for inspecting the quality and completeness of your tests, as it helps you identify areas of your code that are not being tested.
Jest provides a code coverage tool that can generate a coverage report for your tests. This report shows you the percentage of code that is covered by your tests, as well as any lines of code that are not being tested.
To use the Jest code coverage tool, you can simply run your tests with the –coverage flag:
jest –coverage
This will generate a coverage report in the coverage directory of your project. The report will be in HTML format, which you can view in your web browser.
5. Custom Matchers
Custom matchers in Jest allow you to create your own assertion functions that can be used in your tests. This is useful when you need to test for a specific condition that is not covered by the built-in matchers. You can use expect.extend() to create a custom matcher.
For example, let’s say you are building a shopping cart application, and you want to write a test that checks whether the total price of items in the cart is correct. The built-in Jest matchers don’t have a matcher that can check this condition, so you can create your own custom matcher.

6. Test Configuration
Jest provides a lot of configuration options that allow you to customize the behavior of your tests. You can configure Jest using the jest.config.js file. This file can be used to set global test settings, such as the test environment, test runner, and coverage thresholds. Here are some scenarios where you may need to use test configuration:
a. Changing the Test Environment
Sometimes, your code may depend on certain environmental variables, such as the presence of a specific database. Jest allows you to set the test environment using the testEnvironment configuration option in the jest.config.js file. For example, if you are going to use a custom environment, you can set it like this:

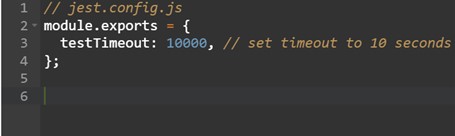
b. Setting Global Test Settings
Jest allows you to set global test settings that will be applied to all tests. For example, you can set the test timeout using the testTimeout configuration option in the jest.config.js file. Here’s an example:
c. Configuring Code Coverage
Jest allows you to configure code coverage using the coverageThreshold configuration option in the jest.config.js file. This option lets you set coverage thresholds that must be met for each file, statement, function, and line. Here’s an example:
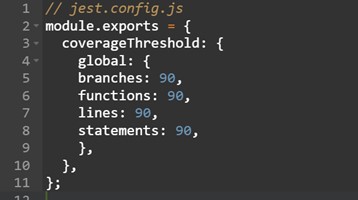
This configuration sets the coverage threshold to 90% for branches, functions, lines, and statements.
7. Configuring Test File Patterns
By default, Jest will look for test files in the __tests__ directory or any file that ends with .test.js or .spec.js. However, you can customize the pattern that Jest uses to find test files using the testMatch configuration option in the jest.config.js file. For example:

This configuration sets the pattern to look for test files in any subdirectory of __tests__ and any file that ends with .spec.js or .test.js.
8. Test Environment
Jest provides several test environments, such as jsdom, node, and puppeteer. These environments allow you to test your code in different contexts, such as a browser or a headless browser. You can use the testEnvironment configuration option to specify the test environment.
Empower Your Jest Tests with the Ultimate Cloud-Based Testing Solution – Join LambdaTest Now!

LambdaTest is a cloud-based testing platform that offers a unified digital experience testing cloud to help businesses ensure exceptional user experiences across all devices and browsers. The platform offers a reliable, secure, and high-performance test execution cloud built for scale, allowing businesses to accelerate their go-to-market strategies.
LambdaTest’s Jest cloud grid allows you to perform Jest tests at scale by executing them at across a wide range of browsers and operating systems. With more than 3000+ real browsers and devices and 40+ browser combinations, LambdaTest enables developers to perform efficient cross-browser and mobile app testing, eliminating the challenges associated with managing in-house testing infrastructure.
Here’s an example Jest test that can be run on the LambdaTest platform:
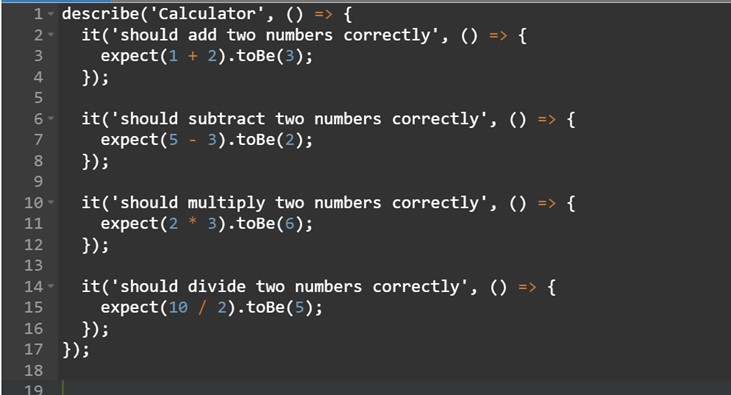
This is a basic set of tests for a calculator app. It uses the Jest testing framework to ensure that basic math operations are functioning correctly.
To run this test on the LambdaTest platform, you can follow these steps:
- Log in to the LambdaTest platform and create a new project.
- Choose “Jest” as the testing framework.
- Upload your test code and generate the Capability Matrix using the Desired Capabilitiues Generator that will allow to choose from different combinations of environments.
- Configure your test settings by getting the access key from the Automation Dashboard, which is the private token to connect to the platform.
- Start the test run and wait for the results.
Once the test run is complete, you can view the results on the LambdaTest platform and analyze any errors or issues that were encountered during testing. This is just a basic example, but LambdaTest supports a wide range of testing scenarios and frameworks, making it a powerful tool for ensuring the quality of your digital experiences.
Conclusion
Jest tests are a powerful tool that can help developers ensure their code is working as intended. With the use of advanced techniques, these tests can become even more efficient and effective.
Perhaps it is the most important technique is to write clear and concise tests. Tests should be easy to read and understand, with descriptive names and comments where necessary. This can help ensure that other developers can easily understand and maintain your code.